Planning a Wearable Electronics Project
Introduction
Wearable electronics can be one of the most fascinating yet frustrating activities for beginners. In addition to circuit design and coding, we also have to take into consideration the construction time involved in sewing, and the pros and cons of different fabrics or materials to which the circuits may be attached. Here’s a guide to planning a successful project with LilyPad or other wearables products.

Brainstorming
Let’s begin with a rough outline of what our project looks like and what it does. Use a method that works for you, such as:
- Creating an inspiration board or collage
- Drawing rough sketches in a notebook
- Writing a list of features or ideas for project function or design
- Doing online research and collecting inspirational projects
- Making wish lists of hardware you want to use
- Thrift shopping or looking through your closet for items to build upon
Additional Brainstorming Tips:
- Keep a list of the components you may want to use as well as raw materials, such as fabric or specialty items, along with any of your brainstorming sketches.
- If starting with an existing garment/fabric project: take photos, make rough sketches of it, or trace key details onto paper to help plan circuit layout.
- If designing a garment from scratch: make deliberate decisions during your patterning process that include where components may attach or wiring (conductive thread) may run.
- Identify any problem areas before construction time - are there places on the project that may be difficult to sew onto or to access?
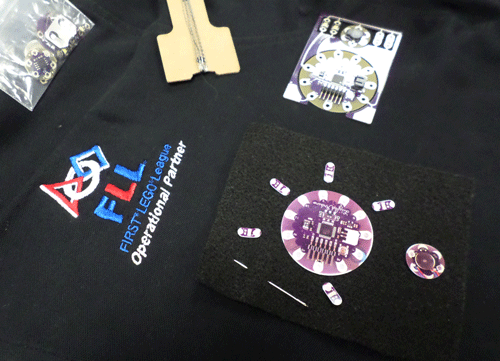
This student used printed LilyPad images to plan exact placement of a patch that would later be sewn behind the logo of a t shirt.
Project Planning Checklist
Here is a checklist of questions to consider when planning the specifics of your project:
What is the base material/fabric?
Is it delicate, stretchy, thin? You may need reinforcing material such as interfacing so components don’t pull loose or move on the fabric.
How durable does the project need to be?
Is it a one-time showpiece or will it get a lot of use (such as a theater project that needs to survive multiple performances)? Sometimes soldering together components may be a more durable option than sewing. Silicone wire is a great option if you decide to solder components together. Ribbon cable may also be a good option for projects with multiple thread lines such as the three to four connections needed for the LilyPad Pixel boards.
Reinforcing or covering components that are in areas of high flex or wear is also something to consider for the longevity of your project.
Do I want to see the circuit or not?
Hiding components under layers or linings will keep the “magical” quality of the circuit whereas building on top of a costume can incorporate the boards as decorative elements. Experiment with decorative accents such as beads, sequins, or buttons to strategically hide components and make them blend in. If using decorative items with a metallic finish, coat in clear nail polish to avoid accidental shorts in the the thread or components.
Will it be easy to access any switches, batteries, or sensors?
Consider how the inputs will be used - where is the most sensible place for a wearer to access these components? For example, hiding a switch in the back of a dress would make it inaccessible for the wearer to use (unless they are super flexible). A better spot may be along the waistline or sleeves.
Some wearable technologies, like EL Wire, need larger packs for inverters and batteries that may not fit easily in some clothing designs. Others, such as Polymer Lithium Ion Batteries, may be delicate and need a special pouch or placement away from sharp objects or potential crushing. For more information on powering your project, see our tutorial.
How will the circuit be insulated?
Most costuming or wearable projects will be moving on the body and can be prone to short circuits. For conductive thread traces in close proximity to each other, we recommend insulating the project to protect against accidental short circuits. Check out our Insulation Techniques for e-Textiles tutorial for some ideas. This should be the last step in your project once it is tested (on a flat, non-metallic surface) and before it is worn.
Prototyping
After gathering the materials and components planned during brainstorming, it is time to prototype the circuit. To avoid the frustration of sewing things together only to find out they don’t work the way you planned, we recommend using alligator clips to temporarily connect LilyPad components and then testing the circuit and/or code.
If using a product that comes in Protosnap form, such as the ProtoSnap LilyTwinkle, LilyPad ProtoSnap Plus, or LilyMini ProtoSnap, you can skip the alligator clips since the boards have traces connecting them. If adding additional sensors or pieces to a Protosnap board, use alligator clips.

An example of prototyping with alligator clips from our LilyTiny Plush Monster Tutorial.
If you are using a microcontroller, now is the time to start writing some code (or adapting some example code). A basic framework for your project’s behavior or interaction completed before build time will help with any troubleshooting later in the process. Keep in mind that you can always go back and refine or edit your code once the project is completely sewn together as long as you leave the connection point (FTDI headers if using a LilyPad Arduino) easily accessible in your design.
Refining Your Design
After some basic prototyping with your components, take some time to do a more refined sketch or diagram of the circuit layout. This is an opportunity to catch any problems with the design (crossed conductive thread paths, lack of room for components, etc.) before you start the construction process. This final sketch can also serve as a guideline if components get misplaced or moved during the build process.

An example of a design layout created in a graphics program - note the inclusion of a diagram of the garment as well as detailed labeling of the hook ups for the boards.

This project uses a handout created by Creativity Labs to finalize the circuit layout.
Diagramming with Fritzing
Fritzing is a great open source tool that allows you to design a schematic and wiring diagrams. The program allows you to drag and drop components in a window and drag wiring lines between them to brainstorm or document hook ups. If you prefer a computer generated circuit diagram to hand sketching, Fritzing is a great choice that also comes pre-loaded with a lot of LilyPad components to use.
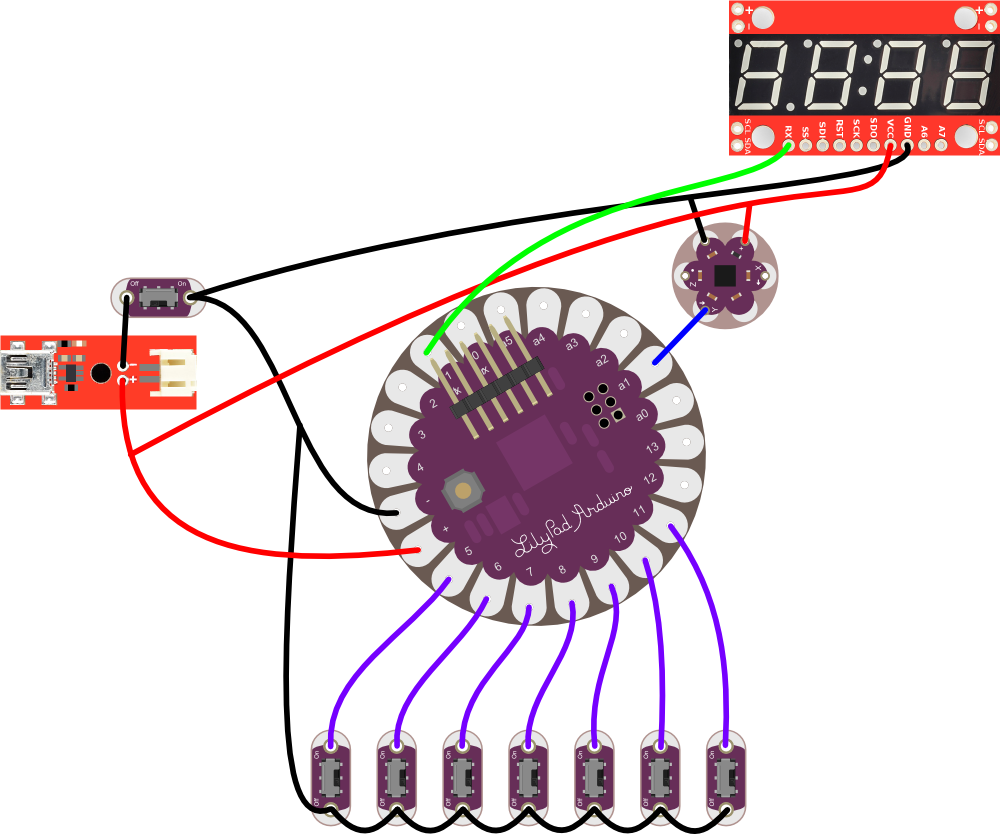
An example of a LilyPad Arduino project diagram created with Fritzing.
After doing a final sketch it is time to connect the electronics. Depending on your design, you may also be able to place the clipped pieces on your project to help plan final placement.
Build Time
Now that we have all that pesky planning out of the way, it’s time to build a project!
Tips for construction:
- Break the work down into sections or stages of construction, such as sewing in a LilyPad Arduino first and working on LEDs or sensors in batches.
- If possible, prototype and test connections as you complete them. This will catch any problems before the project is finished and may allow more time to fix or change as you go.
- Never work on a powered project! Remember that conductive thread is essentially uninsulated wire. If you were testing a section of the project, be sure to unplug or turn off before beginning construction again.
Resources and Going Further
Here are some links to a wide variety of e-textiles resources
- E-textiles Blog Posts on SparkFun Education Blog
- SparkFun.com E-textiles Resources
- Classroom Projects on InventorSpace