Configuring Scratch to AutoStart
Create the AutoStart Shell Script
Once you have your Scratch program dialed in and you want to remove it from a monitor / keyboard / mouse, you need a way to kick off your program automatically when the Raspberry Pi boots up. These are a few instructions on how to setup a Scratch program to autoStart.
- Open up a command-line terminal.
- Create the auto start shell script.
Type the following command: nano scratchauto.sh - This opens a basic text editor called nano. Now, type in the following 'script'.
sudo pkill -f scratchgpio_handlerThen, press CTRL+X, Y, ENTER to save. The file rsc.sb is a default file that will be loaded automatically when Scratch starts. If you want to change this to a different file, you can change it here.
cd /opt/scratchgpio8
sudo python scratchgpio_handler8.py &
scratch presentation "/home/pi/Scratch/rsc.sb" - At the command prompt, set the file permissions of this new file to be executable. Type this:
chmod +x scratchauto.sh - Create the autostart folder. This is in a hidden subfolder called .config - note, the period (.) is part of the flie name. Type the following command in the command prompt:
mkdir -p /home/pi/.config/autostart - Close the terminal window.
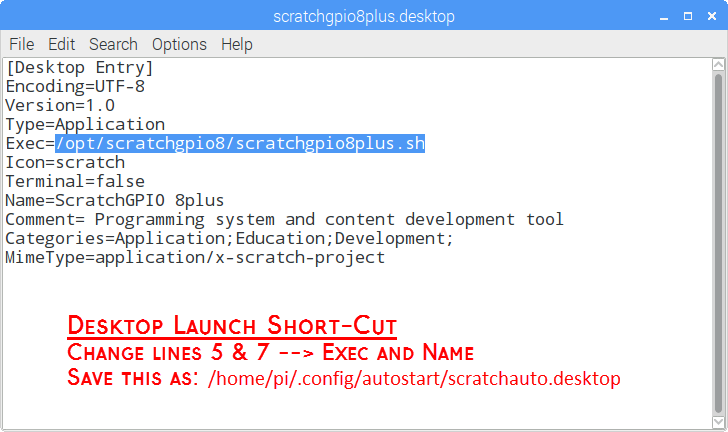
- Create the desktop launch short-cut
- Right-click on the ScratchGPIO8plus icon on the desktop and select Text Editor
- Change lines 5 & 8 to:
Exec=/home/pi/scratchauto.sh
Name=Scratch Auto Start - Click File→ Save As, and save the modified desktop launch short-cut as: /home/pi/.config/autostart/scratchauto.desktop
- Restart the Raspberry Pi and check to make sure that Scratch starts up as expected.
- Now, find the Scratch program that you wish to auto-start. Save this as rsc.sb in the Scratch Projects folder. Make sure that any initializations or other blocks that need to be executed are tied to the When Flag Event block. This is automatically kicked off when Scratch is started in Presentation mode.
If you are going to be running this headless, it's suggested to add some kind of unique boot-up blinking sequence so that you know when the computer has completed its boot-up cycle.
Part II -- AutoStart for Python Scripts
What about creating an auto-start for a python script? The process is very similar, but you need to make sure that you only have one script that is controlling and talking to the GPIO pins - otherwise they may conflict with each other. To create an autostart for a python script, create a new desktop launch short-cut called pythonautostart.desktop. To do this, we'll use the same technique we did before:
- Open up a command-line terminal.
- Create the auto start shell script.
Type the following command: nano pythonauto.sh - This opens a basic text editor called nano. Now, type in the following 'script'.
sudo python /home/pi/blink11.py
Then, press CTRL+X, then Y to save. This will start the example python script blink11.py - Create the desktop launch short-cut. Similar to the way we did it with Scratch.
- Right-click on the ScratchGPIO8plus icon on the desktop and select Text Editor.
- Change lines 5, 6 & 8 to:
Exec=/home/pi/pythonauto.sh
Icon=python
Name=Python Auto Start - Click File→ Save As, and save the modified desktop launch short-cut as: /home/pi/.config/autostart/pythonautostart.desktop
- Using the file browser, navigate to /home/pi/.config/autostart -- Be sure to delete or remove the scratchautostart.desktop file from this folder s that you don't have two programs trying to control the GPIO pins at the same time.