Switch Basics
Introduction
One of the most elementary and easy-to-overlook circuit component is the switch.
Switches don’t require any fancy equations to evaluate. All they do is select between an open circuit and a short circuit. Simple. But how could we live without buttons and switches!? What good is a blinky circuit with no user input? Or a deadly robot with no kill switch? What would our world be without with big red buttons you should never, ever press.
Covered in This Tutorial
- Momentary vs. Maintained Switches
- What do SPST, SPDT, DPDT, etc. all mean?
- The difference between normally closed and normally open buttons
- Lots of pretty button pictures
- Important switch ratings
- Switch applications
Suggested Reading
Before diving into this tutorial, make sure you’re up to snuff on the most basic of electronics knowledge. If you’re not familiar with the following concepts, consider reading their tutorials first. Then come back, and we’ll have some fun button talk.
- What is a circuit? - Especially know the difference between an open and closed circuit
- Voltage, Current, Resistance, and Ohm’s Law
- Power
- How to Use a Multimeter
- Binary
What is a Switch?
A switch is a component which controls the open-ness or closed-ness of an electric circuit. They allow control over current flow in a circuit (without having to actually get in there and manually cut or splice the wires). Switches are critical components in any circuit which requires user interaction or control.
A switch can only exist in one of two states: open or closed. In the off state, a switch looks like an open gap in the circuit. This, in effect, looks like an open circuit, preventing current from flowing.
In the on state, a switch acts just like a piece of perfectly-conducting wire. A short. This closes the circuit, turning the system “on” and allowing current to flow unimpeded through the rest of the system.
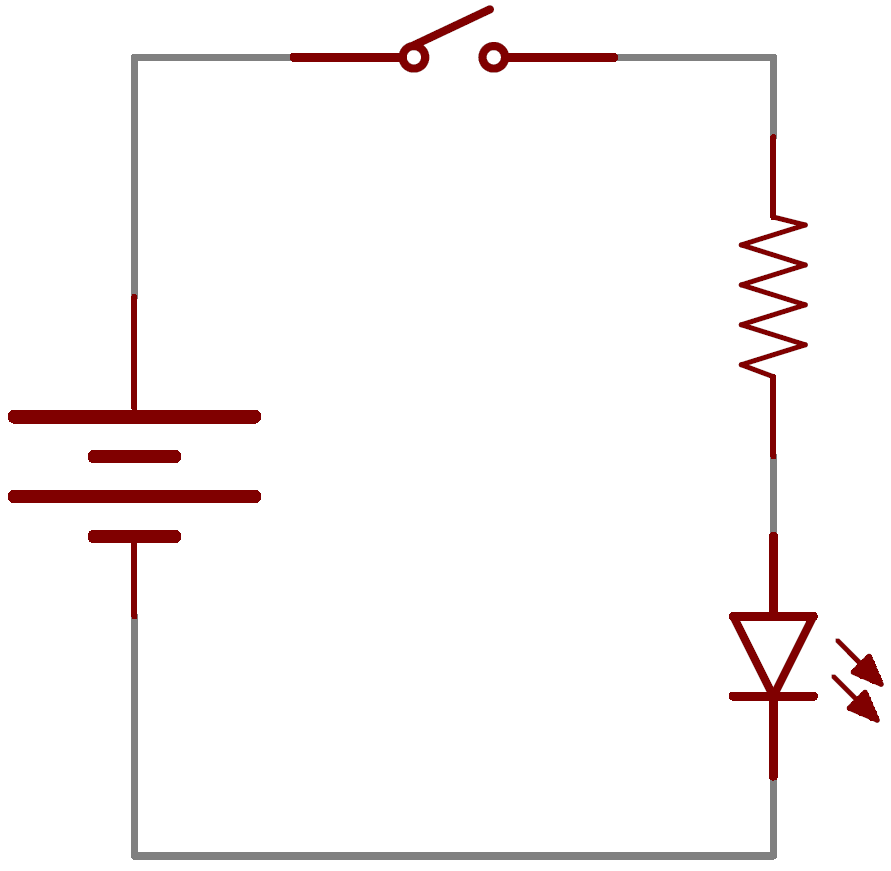
A circuit diagram with an LED, resistor, and a switch. When the switch is closed, current flows and the LED can illuminate. Otherwise no current flows, and the LED receives no power.
There are tons and tons of switches out there: toggle, rotary, DIP, push-button, rocker, membrane, … the list just goes on and on. Each of those switch types has a set of unique characteristics to differentiate it from others. Characteristics like what action flips the switch, or how many circuits the switch can control. Next up, we’ll go over some of the more basic switch characteristics.
Defining Characteristics
Actuation Method
In order to change from one state to another, a switch must be actuated. That is, some sort of physical action must be performed to “flip” the switch’s state. The actuation-method of a switch is one of its more defining characteristics.
Some examples of switch types. Push button, rocker, slide, and magnetic.
Switch actuation can come from pushing, sliding, rocking, rotating, throwing, pulling, key-turning, heating, magnetizing, kicking, snapping, licking,…any physical interaction which can cause the mechanical linkages inside the switch to come into, or go out of, contact.
Momentary vs. Maintained
All switches fall into one of two distinct categories: momentary or maintained.
Maintained switches – like the light switches on your wall – stay in one state until actuated into a new one, and then remain in that state until acted upon once again. These switches might also be called toggle or ON/OFF switches.
Momentary switches only remain active as long as they’re actuated. If they’re not being actuated, they remain in their “off” state. You’ve probably got a momentary switch (or 50) right in front of you…keys on a keyboard!
Semantic alert! Most of the switches we refer to as “buttons” fall in the momentary category. Activating a button usually means pressing down on it in some manner, which just feels like a momentary control. There are such things as a maintained button, but for this tutorial when we slip and talk about “buttons”, think “momentary push-down switch”.
Mounting Style
As with most components, the termination style of a switch always comes down to either surface mount (SMD) or through-hole (PTH). Through-hole switches are usually larger in size. Some might be designed to fit in a breadboard for easy prototyping.
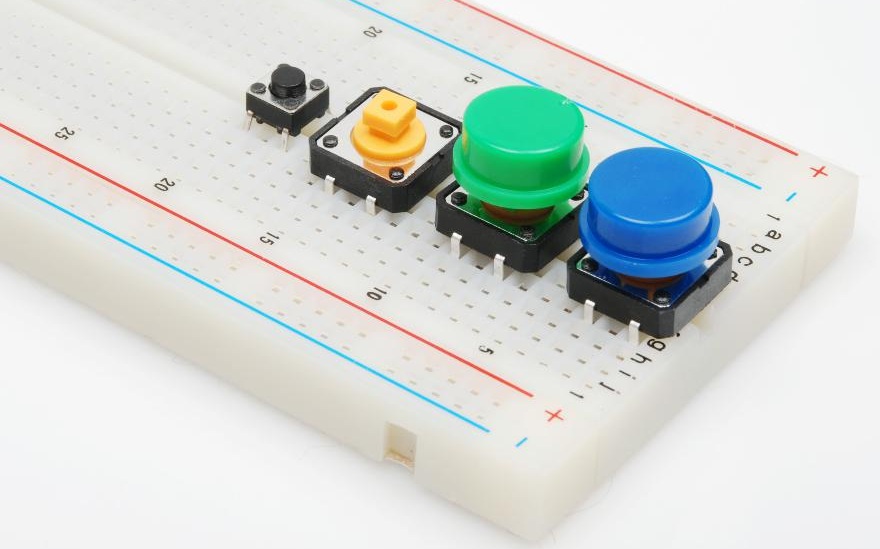
These Tactile buttons are through-hole and fit perfectly in a breadboard. Great for prototyping!
SMD switches are smaller than their PTH counterparts. They sit flat, on top of a PCB. SMD switches usually require a gentle touch, they’re not built to sustain as much switching force as a through-hole switch.
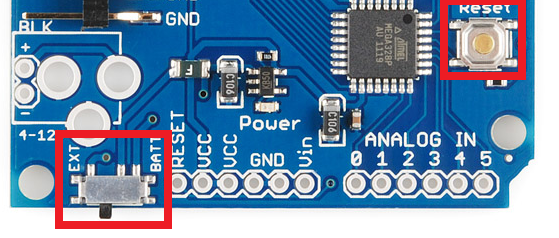
The Arduino Pro has two SMD switches: a slide switch for power control, and a push-button for reset control.
Panel mount switches – designed to sit outside an enclosure – are a popular mounting style as well. It’s hard to flip a switch when it’s hidden inside an enclosure. Panel mount switches come in all sorts of termination styles: PTH, SMD, or heavy-duty solder lugs for soldering to wires.
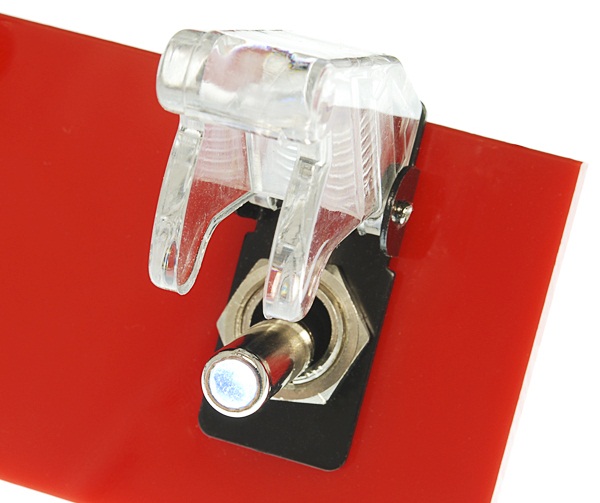
A panel mounted illuminated toggle switch.
One more important switch characteristic, which really deserves a page of its own, is the internal circuit arrangement of a switch. Are you looking for an SPST? DPST? 4PDT? What-P-what-now?
Poles and Throws, Open and Closed
A switch must have at least two terminals, one for the current to (potentially) go in, another to (potentially) come out. That only describes the simplest version of a switch though. More often than not, a switch has more than two pins. So how do all of those terminals line up with the internal workings of the switch? This is where knowing how many poles and throws a switch has is essential.
The number of poles* on a switch defines how many separate circuits the switch can control. So a switch with one pole, can only influence one single circuit. A four-pole switch can separately control four different circuits.
A switch’s throw-count defines how many positions each of the switch’s poles can be connected to. For example, if a switch has two throws, each circuit (pole) in the switch can be connected to one of two terminals.
Knowing how many poles and throws a switch has, it can be more specifically classified. Commonly you’ll see switches defined as “single-pole, single-throw”, “single-pole, double-throw”, “double-pole, double-throw”, which are more often abbreviated down to SPST, SPDT, and DPDT, respectively.
SPST
A single-pole, single-throw (SPST) switch is as simple as it gets. It’s got one output and one input. The switch will either be closed or completely disconnected. SPSTs are perfect for on-off switching. They’re also a very common form of momentary switches. SPST switches should only require two terminals.
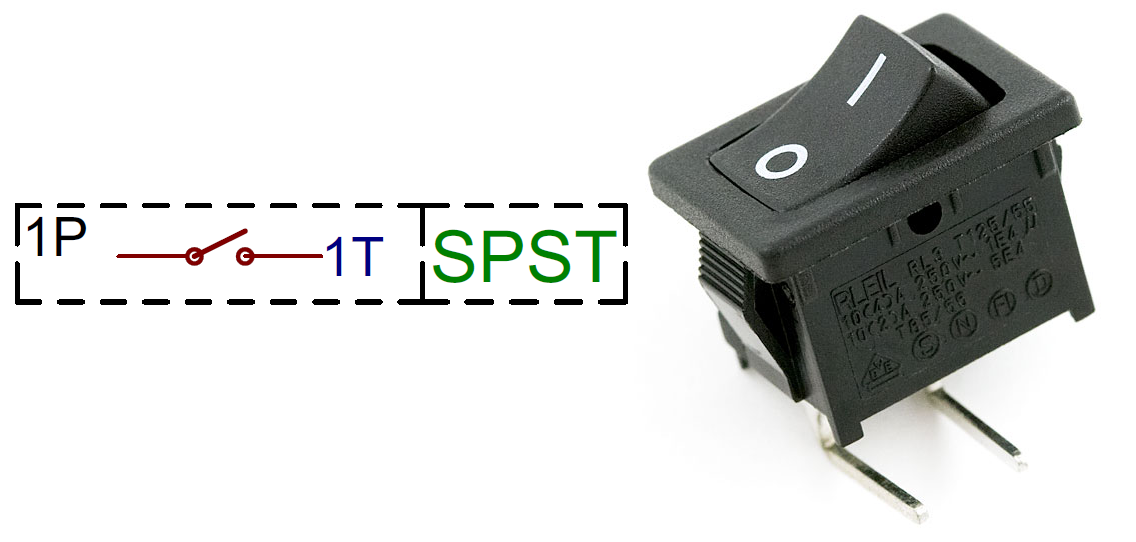
The circuit symbol for an SPST switch in the off position and a through-hole, right-angle, maintained, SPST, rocker switch.
SPDT
Another common switch-type is the SPDT. SPDTs have three terminals: one common pin and two pins which vie for connection to the common. SPDTs are great for selecting between two power sources, swapping inputs, or whatever it is you do with two circuits trying to go one place. Most simple slide switches are of the SPDT variety. SPDT switches should usually have three terminals. (Sidenote: in a pinch an SPDT can actually be made into an SPST by just leaving one of the switch throws unconnected).

An SPDT switch circuit symbol, and an SPDT slide switch.
DPDT
Adding another pole to the SPDT creates a double-pole, double-throw (DPDT) switch. Basically two SPDT switches, which can control two separate circuits, but are always switched together by a single actuator. DPDTs should have six terminals.
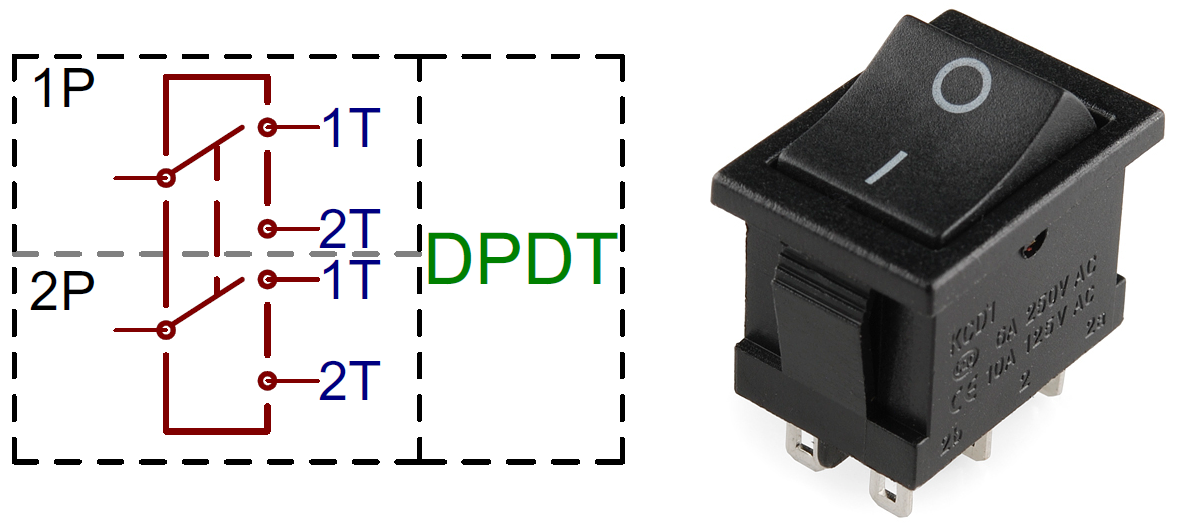
A DPDT circuit symbol, and a 6-terminal DPDT rocker switch.
XPYT
Switches with more than two poles or throws are not too common, but they’re out there (in all their oddly-shaped, difficult-to-connect-to glory). Once we get past one or two poles/throws, we just start sticking numbers in the abbreviation. Here’s a 4PDT switch, for example, it can control four separate circuits, 2 positions per circuit:
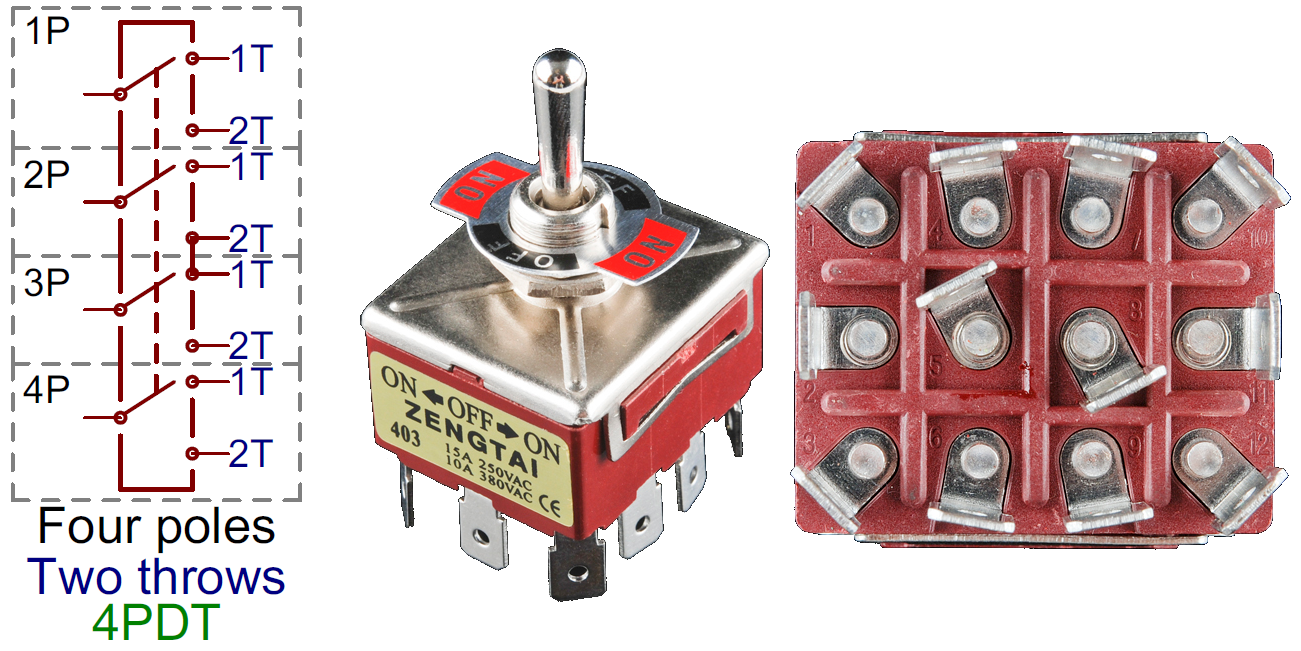
A massive 4PDT circuit symbol, and an physically massive 4PDT toggle switch.
* Just remember: it’s “poles”, not “pulls”. Seasoned engineers just love picking on poor saps who were only looking for a “single-pull, double-throw” switch. (Not speaking from experience here or anything… I mean, in my defence, I didn’t read it in a book, just heard it ambiguously pronounced by the professor. Meanies.)
Normally Open/Closed
When a momentary switch is not actuated, it’s in a “normal” state. Depending on how the button is constructed, its normal state can be either an open circuit or a short circuit. When a button is open until actuated, it’s said to be normally open (abbreviated NO). When you actuate an NO switch, you’re closing the circuit, which is why these are also called “push-to-make” switches.
Conversely, if a button usually acts like a short circuit unless actuated, it’s called a normally closed (NC) switch. NC switches are “push-to-break”; actuating the switch creates an open circuit.
Among the two types, you’re probably much more likely to encounter a normally open momentary switch.
Momentary Switches
Momentary switches are switches which only remain in their on state as long as they’re being actuated (pressed, held, magnetized, etc.). Most often momentary switches are best used for intermittent user-input cases; stuff like reset or keypad buttons.
Examples of Momentary Switches
Push-button
Push-button switches are the classic momentary switch. Typically these switches have a really nice, tactile, “clicky” feedback when you press them. They come in all sorts of flavors: big, small, colorful, illuminated (when an LED shines up through the button). They might be terminated as through-hole, surface-mount, or even panel-mount.
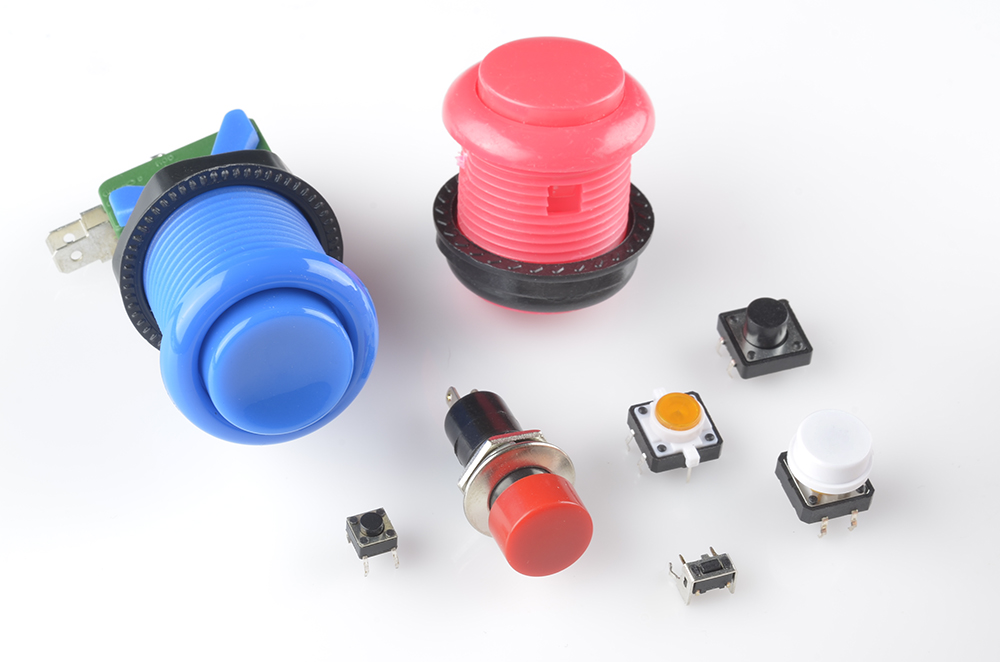
An assortment of tactile push-button switches. Starting top-left, clockwise: blue and pink arcade buttons, 12mm push button, white capped button, orange illuminated, right-angle, panel-mount, and a mini push button.
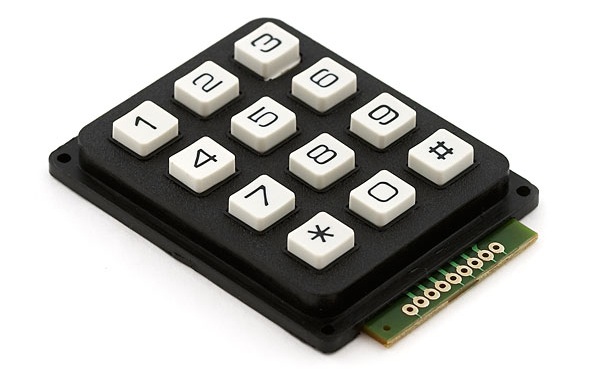
Button Matrices
Large arrays of momentary buttons, like your keyboard or even smaller groupings like a keypad, usually arrange all of their switches into a big matrix. Every button on the pad is assigned a row and column . This requires some extra button-press-processing on the microcontroller end, but frees up a big chunk of I/O pins.
Etc.
Momentary switches don’t always have to be actuated by a pushdown. It could be push-sideways, like the movement action in a handful of joysticks.
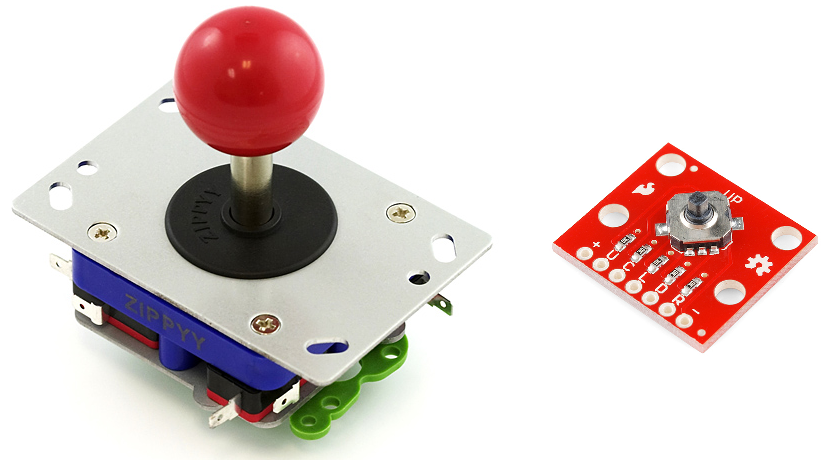
An arcade joystick uses four microswitches to sense up, down, left and right movements. The tiny little surface-mount 5-way tactile switch is an SP5T directional switch (up, down, left, right, and press-down).
On the other end of the spectrum, reed switches open or close when exposed to the presence of a magnetic field. These are great for making a non-contact switch.
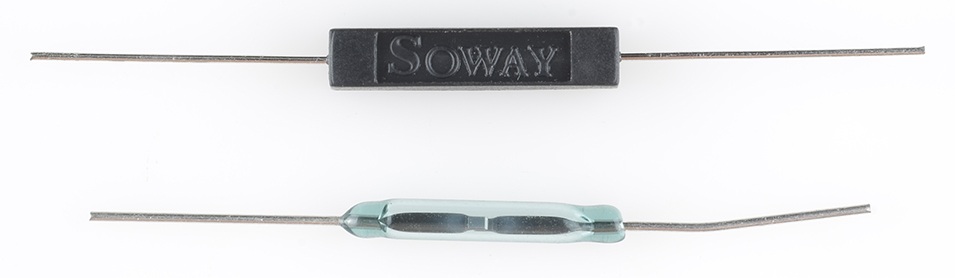
A couple of reed switches: non-insulated (bottom) and insulated.
Maintained Switches
A maintained switch retains its state until it’s actuated into a new one. Just look to the nearest wall for an example of a maintained switch – the thing controlling your lights! Maintained switches are great for set-it-and-leave it applications like turning power on and off.
Examples of Maintained Switches
Slide Switch
Need a really basic, no-frills ON/OFF or selector switch. Slide switches might be for you! These switches have a tiny little nub which protrudes from the switch, and it slides across the body into one of two (or more) positions.
You’ll usually find slide switches in SPDT or DPDT configurations. The common terminal is usually in the middle, and the two select positions are on the outside.
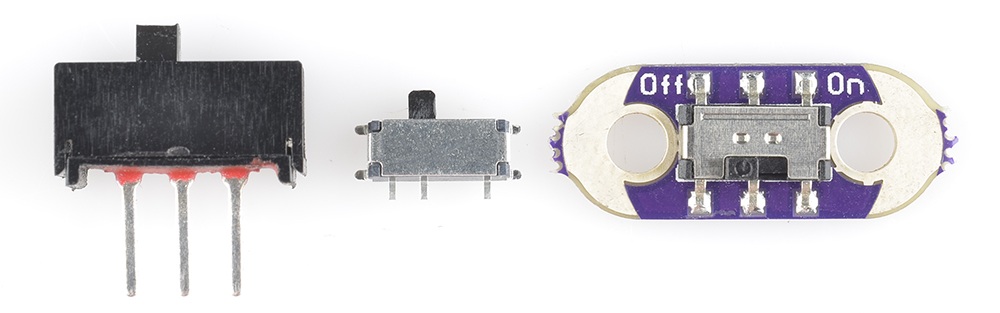
Some examples of slide switches: a mini PTH slide switch, an SMD right-angle switch, and an SMD DPDT slide switchmounted on a LilyPad.
Toggle Switch
When you hear toggle switch, think “fire ze missiles!”. Toggle switches have a long lever, which moves in a rocking motion. As they move to a new position, toggle switches make a really satisfying “snap”.
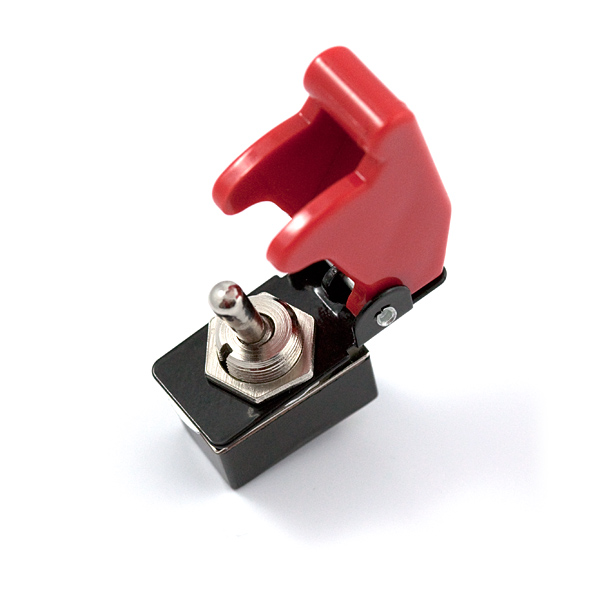
Missle-launch covers are a must when using toggle switches.
Toggle switches are commonly SPST (two terminals) or SPDT (three terminals), though you can find them in otherflavors as well. As usual, you can find them in through-hole, surface-mount, or – probably most commonly – as panel-mountable.
DIP Switch
DIP switches are through-hole switches designed in the same mold as a through-hole DIP IC. They can be placed in a breadboard, in the same manner a through-hole IC might, by straddling the center area.
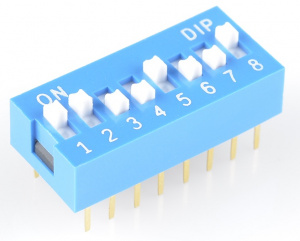
An 8-position DIP switch, handy for configuring 8 somethings.
These switches often come in arrays of eight or more separate SPST switches, with tiny little sliding levers. They were widely used in the olden days of computing, but they’re still useful for configuring a devices via hardware.
Latching Buttons
Push-buttons aren’t all momentary. Some push-buttons will latch into place, maintaining their state until pressed again latching back to where the started. These can be found, for example, in stomp switches on guitar effect pedals.
Etc.
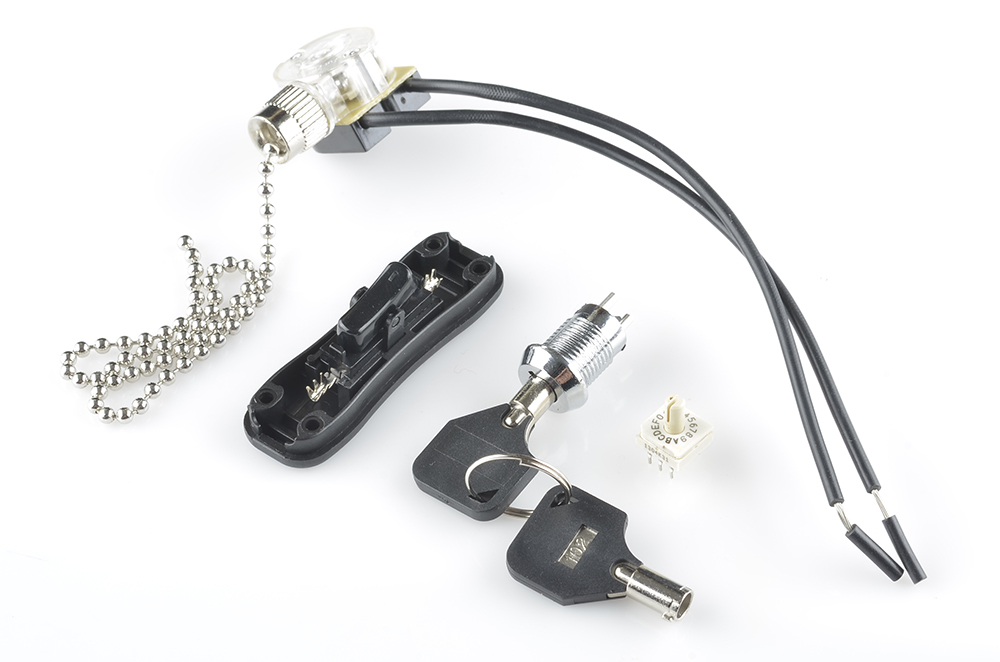
We’ve barely started to cover the huge variety of maintained switches out there. There’s pull-chain switches, which add a really classy touch to your project. Key-switches, for when you don’t want just anybody turning on your killer robot. Rotary switches – like those on a multimeter – provide a unique input device, especially when you’ve need a high number of throws.
And, of course, what mad scientist could live without a big ol’ knife-switch?
Switch Applications
On/Off Control
Among the most obvious of switch applications is simple on and off control. The type of control you perform every time you walk into a dark room. An on/off switch can be implemented by simply sticking an SPST switch in series with a power-line. Usually the on/off switch will be maintained, like a toggle or slide switch, but momentary on/off switches can have their purpose.
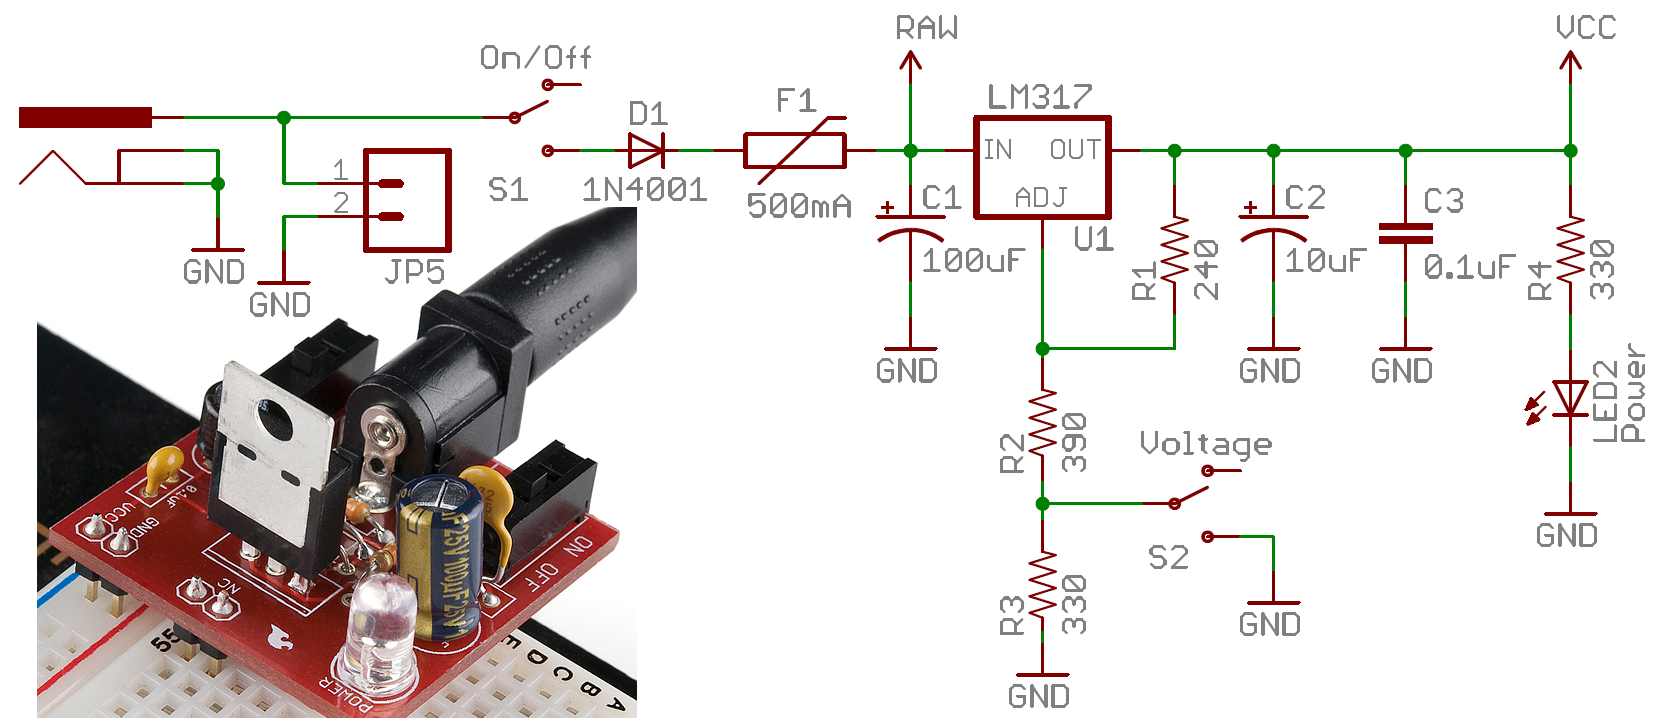
On this Breadboard Power Supply, an SPDT switch is used to turn the circuit on and off. (A second SPDT switch is used to select the adjustable voltage regulator’s output value by adjusting a voltage divider.)
When implementing such a switch, keep in mind that all the current your project consumes is going to run through that switch. Ideally a switch is a perfect conductor, but realistically it’s got a small amount of resistance between the two contacts. Because of that resistance, all switches are rated for a maximum amount of current they can withstand. Exceed a switch’s maximum current rating, and you can expect melted plastic and magic smoke.
For example, this SPDT slide switch is great for controlling current flow in small projects (like Simons or Metronomes), but don’t try using it to control beefy motor controllers, or strings of 100 LEDs. For that, consider using something like a 4A toggle switch or a 6A lamp switch.
User Input
Of course, user input is one of the more common applications for switches. For example, if you want to connect a switch to a microcontroller input pin, a simple circuit like this is all you’d need:
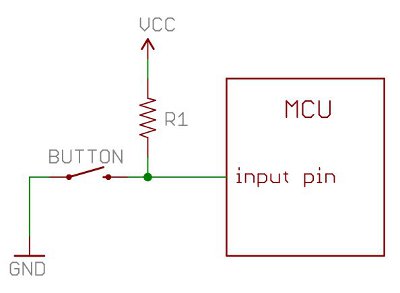
When the switch is open, the MCU pin is connected through the resistor to 5V. When the switch is closed, the pin is tied directly to GND. The resistor in that circuit is a pull-up resistor, required to bias the input high, and prevent a short to ground when the switch is closed.
Resources and Going Further
Well, that about covers the basics of switches. Next up, you could explore some of these other conceptual tutorials:
- Pull-up Resistors - Pull-up resistors complement most momentary button circuits. They ensure that power and ground don’t short, and they make sure I/O lines don’t float.
- Transistors - These can be used (among many other things) as sort-of electronically controlled switches.
- Relays - Another electronically controlled switch. Great for turning on and off high-power circuits.
- Accelerometer Basics - Motion-sensing accelerometers – like those in most smartphones and new video game controllers – are fast-replacing these boring switches as human input devices.
- How to Power a Project - What kind of power source will your switch be turning on and off?
Or check out some of our project tutorials for some inspiration for your own projects. Switches are so widely used, we could probably link all of our projects. But here are a couple which make really ingenious use of switches to do their thing:
- MP3 Player Shield Music Box - This project (bigger on the inside) uses one of those non-traditional switches – a reed switch – to trigger it’s action.
- The Uncertain 7-Cube - Well, this project doesn’t actually have any switches, but that’s what makes it so special! This project is a great example of how an accelerometer could replace a switch as an input device.
- Reaction Timer - Use giant dome push buttons to create a fun reaction game.